

Jefferson Kim, MSE 2094, Term Project (Edited R.D. Kriz 3-5-00)
Stress Intensity Factor, K, is used in fracture mechanics to more accurately predict the stress state ("stress intensity") near the tip of a crack caused by a remote load or residual stresses. When this stress state becomes critical a small crack grows ("extends") and the material fails. The load at which this failure occurs is referred to as the fracture strength. The experimental fracture strength of solid materials is 10 to 1000 times below the theoretical strength values, where tiny internal and external surface cracks create higher stresses near these cracks, hence lowering the theoretical value of strength. The large crack seen in the picture of the Liberty Bell was the result of small cracks and internal residual stresses not known at the time. The original, "as fabricated" cracks were very small and hard to see with naked eyes, and according to Hertzberg, during the war against the British, the bell was polished whenever they saw a crack on the surface. Hardly a solution based on what we understand today. Unlike "stress concentration", Stress Intentsity, K, as the name implies, is a parameter that amplifies the magnitude of the applied stress that includes the geometrical parameter Y (load type). These load types are categorized as Mode-I, -II, or -III. The Mode-I stress intensity factor, KIc is the most often used engineering design parameter in fracture mechanics and hence must be understood if we are to design fracture tolerant materials used in bridges, buildings, aircraft, or even bells. Polishing just won't do if we detect a crack. Typically for most materials if a crack can be seen it is very close to the critical stress state predicted by the "Stress Intensity Factor".
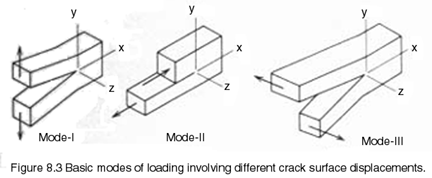
Generally there are three modes to describe different crack surface displacement in Fig.8.3 (Hertzberg, p321). Mode I is opening or tensile mode where the crack surfaces move directly apart. Mode II is sliding or in-plane shear mode where the crack surfaces slide over one another in a direction perpendicular to the leading edge of the crack. Mode III is tearing and antiplane shear mode where the crack surfaces move relative to one another and parallel to the leading edge of the crack. Mode I is the most common load type encountered in engineering design and will be explained here in more detail.
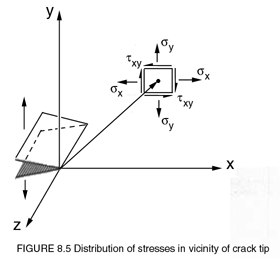
The value of the stress intensity factor, K, is a function of the applied stress, the size and the position of the crack as well as the geometry of the solid piece where the cracks are detected, Fig.8.5 (Hertxberg, p323). The tensile stress in X and Y directions, and the shear stress in the X-Y plane can calculated in terms of K and position can be written as:
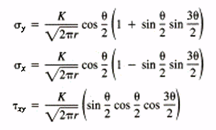
Engineers are mostly worried about the brittle fracture because the brittle fractures bring most devastating accidents and happen rapidly, and usually the brittle fractures take place when the applied stress increases such that the stress state at the crack tip reaches a critical value. The fracture toughness can be defined in terms of the stress intensity factor, K, but at a critical stress state. as:

where Y is a dimensionless parameter that depends on both the specimen and crack geometry in Fig8.11(Callister, p193), and the greek symbol "Sigma" is an applied stress and "a" is crack length. Generally, for the elliptical shaped crack,the equation is modified to include the geometry of the crack with three different Y's.
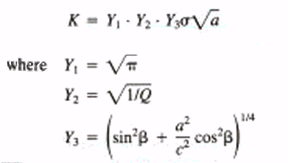
However, Y factor is 1.0 for the plate of infinite width and 1.1 for a plate of semi-infinite width. When the thickness of specimen is very large with respect to the crack length, the stress intensity factor for Mode I is often called the plane strain "Fracture Toughness". This modification of stress intensity into a plane strain fracture toughness parameter can be approximated by a relationship that includes specimen geometry, and yield strength.

Hence the specimen thickness is shown to be the most significant parameter that controls the transition of fracture toughness from "plane stress" to "plane strain", see Fig. 8.12 (Callister, p194).
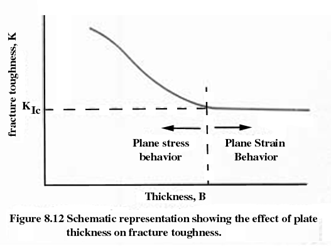
The plain strain fracture toughness for Mode I, KIc is also a function of many other factors such as temperature, strain-rate and microstructure. Hence KIc is unique for a particular material and is a fundamental material property so it is a very important consideration for material selection and design.
KIc, stress, and Y factor are important variables for engineers to design and to determine the safety of machinery, and often the size of the cracks is a very important factor to make decisions such that the maximum allowable size of the crack can be written as

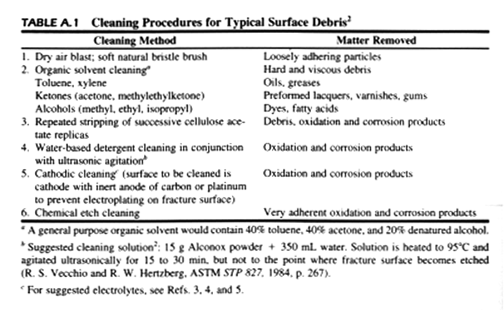
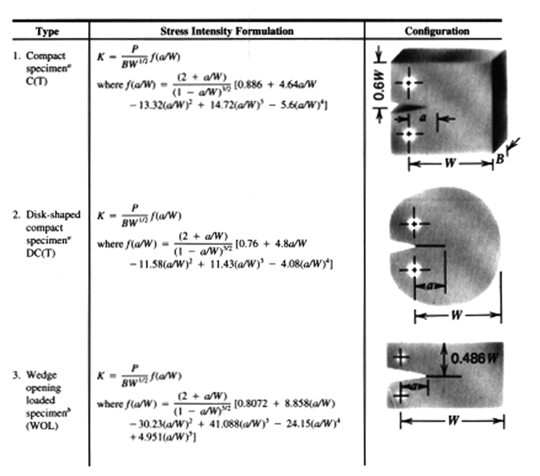
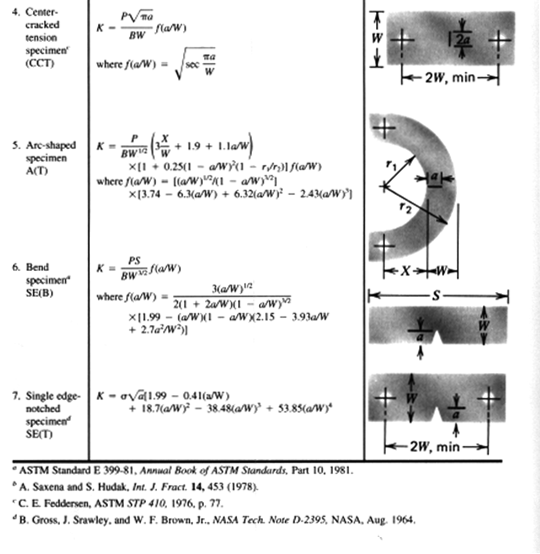
Also because KIc is unique for a particular material, engineers can use this variable for selecting appropriate materials for a range of different applications. From the table in Appendix B engineers can also decide how much load and stress can be allowed for a particular specimen geometry. This critical information helps engineers to optimize the design and the safety on the operations and to prevent or minimize possible accidents. For example, in aircraft components, there are a lot of rivet holes and small cracks which bring Y calibration factor high up to the critical stress. What engineers do is measure the length of cracks to calculate the maximum cracks length and to compare with safety measurement. They can also make a hole at the tip of cracks, which brings down Y calibration factor and the also the the stress concentration. Additionally, engineers clean the fracture surfaces to prevent further damages. Not only does cleaning lower the Y calibration, but it also helps to protect the surface from undesireable chemical reactions. Various cleaning methods are described in the table below.
Stress intensity and fracture toughness are critically important fracture mechanics parameters used by materials engineers and designers. We saw that there are a lot of factors that determine fracture of a material. KIc is an unique material property, that is used by engineers to design and manufacture products for durability and safe operation.
Callister, W. Materials Science and Engieering. John Wiley and Sons, New York1994.
Hertzberg, R. Deformation and Fracture Mechanics of Engineering Materials. John Wiley and Sons, New York 1996.
Submitted by Jefferson K. Kim
Virginia Tech Materials Science and Engineering
http://www.sv.vt.edu/classes/MSE2094_NoteBook/97ClassProj/anal/kim/intensity.html
Last updated: 3/5/00