|
Project |
|
CAVE Conversion Process |
CAVE Conversion Process for 3D-Studio
The convertor I have used for
converting files from 3D-studio to CAVE format is Nugraf. Nugraf contains all
the functionality of 'Polytrans' software allowing Nugraf to import then
translate with high accuracy scene files between all the major 3D file formats.
This program is available for NT/95 operating systems on PC platforms. When
using the product you must buy the plugin for exporting and importing
openflight (.flt) files. The 3D-Studio geometry import plugin module imports
the contents of entire 3D Studio files including all mesh data, (u,v) texture
coordinates, hierarchy, pivot points, materials, lights, cameras, viewports and
(optionally) animation data.
The Openflight format is the defacto standard used in the VisSim (Visual
Simulation) and realtime modeling markets. This is the filetype that is best
supported in the CAVE.
Refer the following webpages for more information on Nugraf, Openflight format
and the new convertors:
http://www.okino.com/nrs/nrs.htm
http://www.okino.com/conv/exp_flt.htm
http://www.okino.com/conv/imp_flt.htm
The following process describes how to convert 3D-Studio .3DS Files into
Openflight format using nugraf. Once the file is in Openflight format, it can
be read directly into the CAVE.
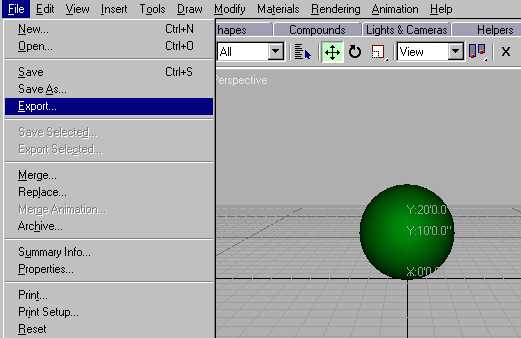
Step#1: Exporting as .3DS
Export the model that was created in 3D Studio as a .3DS file.
File > export
> 3D studio (*.3DS)
Things
to remember when exporting as .3DS
When you export a 3DS file, the following information is exported :
· Position, Rotation and Scale animation. If the controller is a TCB controller, the TCB, Ease In, and Ease Out values are also saved. If the controller is any other type of key controller, the keys are saved but the tangent information is lost. If the controller is not a key controller, only the object's transformation at frame 0 is saved.
· Basic material color/parameters from the Standard material.
· Single maps with their amount, offsets, scales, etc.
· Auto-cubics and Mirrors.
· Target cameras, target spotlights and omni lights.
· Most "static" parameters for cameras and lights, and animation tracks for Roll, Falloff, Hotspot, and FOV.
When you export a 3DS file, the following information is not exported
· Composite and procedural maps.
· UV mapping coordinates.
· Grouped object transformations. There's no concept of group hierarchy in the 3D Editor. Groups export to the Keyframer because the Keyframer understands hierarchies.
· Global shadow parameters.
When you export a 3DS file, the following occur:
· All non-mesh geometry, such as procedural primitives and patches, are collapsed to meshes before export
· Objects are exported as they exist on the frame 3DS VIZ displays at export time.
· Meshes are saved with edge display information and smoothing groups.
· 3DS VIZ instances are saved as Keyframer instances.
Exporting input.max as output.3DS
- the 3D Studio .max fie that you wish to export
- specify an output filename with the .3DS extension.
For sake of continuity, name the output filename the same root as the input filename. For example:
Sphere.max (exported as) sphere.3DS
This will export the sphere.max file as a sphere.3DS file. The original sphere.max file will still exist, but a new .3DS file will be created. Put this in the same directory as sphere.max
Step#2: Importing into Nugraf
Import the .3DS file thus created into Nugraf.
File > Import
3D Geometry > 3D studio (*.3DS)
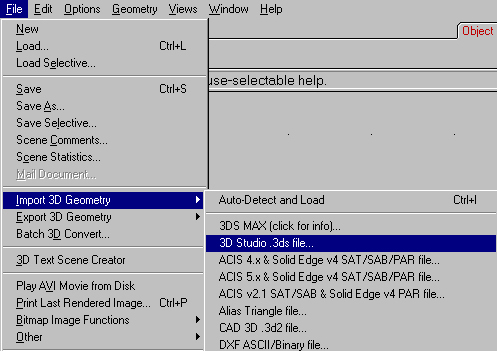
Browse for the *.3DS file you wish to import.
The following dialogue box allows you to select what attributes you want to load.
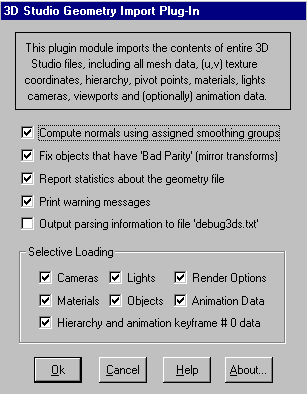
Click Ok when done.
There is no need to resize the perspective camera view, because 3DS file format specifies its own default camera view.
Step#3: Export file as Openflight
Export the .3DS file as an Openflight.flt file
File > export
3D Geometry > Openflight file

The following pop up menu will come up.
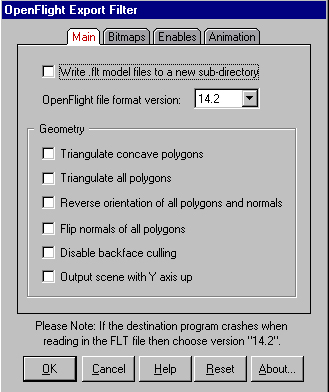
· Make sure the Openflight file format version is set to 14.2.
This is the file format that is read directly into the CAVE.
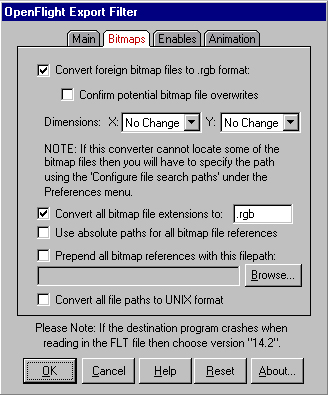
· Go to the bitmaps tag and set the following as the same as the image below.
·
Exporting input.3DS as output.flt
- the 3D Studio .3DS fie that you wish to export
- specify an output filename with the .flt extension.
For sake of continuity, name the output filename the same root as the input filename. For example:
Sphere.3DS (exported as) sphere.flt
This will export the sphere.3DS file as a sphere.flt file. The original sphere.3DS file will still exist, but a new .flt file will be created. Put this in the same directory as sphere.max
All texture maps that have been used during modeling should also be saved in this same directory.
Step#3: Running the
Openflight file (.flt) in the CAVE
This Openflight file (.flt) that you have converted using Nugraf can be directly read into the CAVE. Go to the directory of the model that you have created ,
Then run:
saranav - S .0833
filename.flt
-S is the scale function and .0833 is the conversion factor from inches to feet.
*.max file in 3D studio *.3DS file in Nugraf *.flt file in the CAVE
Caution while Modeling in
3D-Studio Viz
In order to view your model with proper textures and scale, as modeled in 3D-Studio, in the CAVE, you will need to perform the following steps:
1. All texture files have to be sized to powers of two.
See Texture Guidelines for detailed information.
2. The CAVE reads all dimensions in feet. Therefore to relate to the CAVE dimensions it is recommended to work in feet and inches. While running the model in the CAVE it will have to be scaled down by a factor .0833 ( converting inches to feet) since Saranav reads all fields as one inch equal one foot.
See Scale Guidelines for detailed information.
3. Converting 3DS Texture files to RGB
The CAVE requires either JPEG (JPG) or GIF format for texture files, but then these files must also be converted to Silicon Graphics RGB ( red-green-blue) format while running the model in the CAVE.
Download the following script and place it in your path settings.
This script will automatically convert all .jpg texture files to .rgb format.
JpgTorgb ( a script written by David Weatherly, of the Interior Design Futures Laboratory, in PERL to convert all jpegs at once)
See Texture Guidelines for detailed information.
4. All texture maps used during modeling in 3D-Studio viz that have been converted to JPEG and resized to powers of two, should be saved in the same directory along with the *.max, *.3DS and *.flt files of the model and then taken to the CAVE.